Introduction to Minikube
Recently, since the publication of my first book, Containerization with Ansible 2, (Have I mentioned you should buy a copy? :-D) I have been focusing on taking some time off and shutting off my laptop when I’m not at work. However, not unlike most geeks, I can only leave my laptop closed for so long. Most recently, I have been leading a Kubernetes initiative at work, demonstrating the migration of application workloads away from standard Docker into Kubernetes clusters.
This work has involved a lot of trial and error to really nail down a comprehensive migration strategy that is simple to adopt across the organization in phases. To demo some of my ideas, I have been using a local Kubernetes cluster on my laptop using MiniKube. MiniKube is an absolutely fantastic project that completely removes many of the barriers of entry to quickly get started learning and developing using Kubernetes. In a matter of minutes, you can spin up a single node Kubernetes cluster on your laptop, with direct access using the KubeCTL command line tool. Although, it is difficult to test features like high availability of your applications across multiple Kubernetes nodes, you can simply and accurately test the core functionality of your applications deployed in a Kubernetes environment.
Installing MiniKube in Ubuntu
Installing Minikube in Ubuntu (or other Unix-like operating systems) is relatively simple. In essence, MiniKube is a self-contained VM that gets launched on your laptop using a simplified command line interface, much like a Vagrant box. Before beginning, you must first install a hypervisor on your laptop (I perfer VirtualBox).
Once you have VirutalBox installed and ready to go, you can use the curl command to install the MiniKube and KubeCTL binaries:
curl -Lo minikube https://storage.googleapis.com/minikube/releases/v0.24.1/minikube-linux-amd64

curl -Lo kubectl https://storage.googleapis.com/kubernetes-release/release/v1.8.0/bin/linux/amd64/kubectl
Once the binaries have been downloaded, copy them /usr/local/bin and give them executable permissions:
sudo cp minikube /usr/local/bin/
sudo chmod +x /usr/local/bin/minikube
sudo cp kubectl /usr/local/bin/
sudo chmod +x /usr/local/bin/kubectl
Starting MiniKube
Once the MiniKube and KubeCTL binaries are in the respective locations, you can easily start MiniKube by using by aptly named, minikube start command. minikube start will download the MiniKube ISO file, make any required VirtualBox configurations, and copy your the Kubernetes API certificate manager certificates to the ~/.minikube/ directory in your laptop:
aric@local:~$ minikube start
Starting local Kubernetes v1.8.0 cluster...
Starting VM...
Downloading Minikube ISO
 140.01 MB / 140.01 MB [============================================] 100.00% 0s
Getting VM IP address...
Moving files into cluster...
Downloading localkube binary
 148.25 MB / 148.25 MB [============================================] 100.00% 0s
 0 B / 65 B [----------------------------------------------------------]   0.00%
 65 B / 65 B [======================================================] 100.00% 0sSetting up certs...
Connecting to cluster...
Setting up kubeconfig...
Starting cluster components...
Kubectl is now configured to use the cluster.
Loading cached images from config file.
Wait there’s more: It will even configure your Kubernetes credentials in the ~/.kube/ directory so you can immediately access your Kubernetes environment. As soon as MiniKube has finished launching, you can start using the KubeCTL CLI interface right away. Execute the kubectl cluster-info command to see some basic cluster details:
aric@local:~$ kubectl cluster-info
Kubernetes master is running at https://192.168.99.100:8443

To further debug and diagnose cluster problems, use 'kubectl cluster-info dump'.
Deploying an Application in MiniKube
Finally, we can create a simple deployment and service resource we can use to validate the functionality of Kubernetes. Let’s create a simple NGINX server deployment called, “test” using the kubectl run command. We will tell Kubernetes to run a single replica, and listen for traffic coming into the pod on port 80:
aric@local:~$ kubectl run test --image nginx:latest --replicas=1 --port=80
deployment "test" created
To test reachability for our service, we can expose it on a high-numbered NodePort to validate we have network reachability into our cluster:
aric@local:~$ kubectl expose deployment test --type NodePort
service "test" exposed
A randomly assigned NodePort will be exposed listening on the VM IP address we noted from the kubectl cluster-info command we ran earlier. To see which port has been exposed, we can describe the service we just created using the expose command:
aric@local:~$ kubectl describe svc test
Name:                     test
Namespace:                default
Labels:                   run=test
Annotations:              <none>
Selector:                 run=test
Type:                     NodePort
IP:                       10.108.89.122
Port:                     <unset>  80/TCP
TargetPort:               80/TCP
NodePort:                 <unset>  32243/TCP
Endpoints:                172.17.0.4:80
Session Affinity:         None
External Traffic Policy:  Cluster
Events:                   <none>
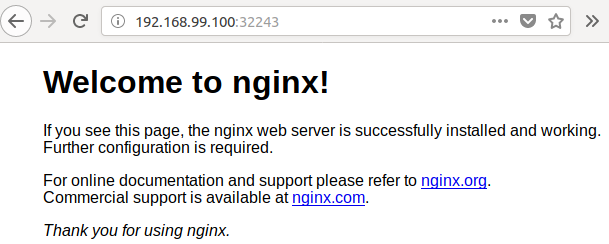
In this example, port number 32243 has been exposed on the IP address: 192.168.99.100 (not be confused with the internal Kubernetes service address: 10.108.89.122.) This address should be accessible from your local web browser:
Now that we have validated that Kubernetes is running and able to start and run pods, we can proceed to working with slightly more advanced concepts: Ingress, Helm, and resources oh my!